Wednesday, December 22, 2010

Poinsettia Tutorial

This isn't my original idea, I saw it somewhere else, but I honestly can't remember where I saw it.  Anyway, I thought this paper poinsettia was really pretty, and so easy to make.
 I started with a 1.5 inch paper strip:
 Cut four pieces on the diagonal:
 Pinch each diamond together in the center, you'll have to play with it a bit:
 Hold them together and wrap the pinched part with wire:
 I used Prima leaves, but if you don't have any, you can make some leaves the exact same way.  Except for pinch the ends together instead of the middle, and clip off the end:
 Add several small buttons, or one large one to the center, and it's done:
Just in time for some last minute holiday cards.  Have fun!
Pin It!

Tuesday, September 14, 2010

DIY scarf tutorial

I came across this DIY scarf in a magazine, and thought it was pretty awesome. Especially, since I was going to try to knit myself a grey scarf this fall, but really didn't see it happening, and this was a whole lot quicker. Here it is, you start with an old shirt:
Lay it flat and snip of the top of the shirt with one horizontal cut under the arm holes. Toss the top half.
Now create fringe along the unhemmed side of what's left by snipping every half inch.
Ta-da! Presto chang-o: shirt to cute scarf. (I think it's cute, anyway.) And it only took 5 minutes.
( Picture courtesy of my daughter, Leah. Didn't she do a good job?) It would look cute from a shirt with a pattern, too. But, I didn't have one.
Pin It!

Friday, September 3, 2010

Tropical flower tutorial

I love tropical flowers, and instead of going bankrupt buying all kinds of embellishments, I found a way to make my own, here is a layout with an example:
It was pretty easy, let me show you how I did it. Please excuse the last three pictures, the battery in my good camera died half way through this process :) Anyway, here is what I started out with: 5 punched out labels, 2 small circles, and a die cut swirl.
I started by cutting the part of the swirl that I wanted to use for my center. Next, I cut the labels into kind of a heart shape, and then cut a very loopy heart out of their centers.
I taped all of the 'petal' ends together, and adhered a yellow circle on the top, and one on the bottom. Next, I taped the in the center.
I arranged the flower with a couple of leaves from Prima, and a tag. Here is the final result:
It came together pretty quick, I hope you can give it a try. Thanks for checking it out!
Pin It!

Thursday, August 26, 2010

Handmade Flower Tutorial

I made a card last night inspired by a Home Interior picture hanging over at my MIL's house, and I'm pretty proud of the way it turned out. All of the flowers are handmade, and so easy to do. The card probably took me a half an hour to complete, once I figured out what I was going to do. The roses are actually a technique I saw in an article in the March/April issue of Creating Keepsakes, found on page 52. The rosebuds, and the calalilies I kind of figured out myself after playing around a bit.

Here is what I started out with: 6 small circles, 2 medium circles, 3 large circles, 2 kite shapes, and 2 die cut leaves.
I began by rolling the small circles, and the 3 end leaves on each branch with the help of the end of a paint brush. I cut the medium circles in half ( they will be the center of the roses, we only use 3 out of the 4 halves), cut the large circles into spirals, and rounded the top 3 corners of the 'kites', and drew a yellow line down the center.
I glued the ends of the small circles together, and then glued them inside the 3 curled leaves. For the roses, I curled the large circles, starting from the outside rolling in, an glued it to the center. I curled the medium circle halves, glued the ends and glued them into the centers of the large circles. The calilies took a little playing around with, I rolled them around on the paintbrush end for easier shaping, I also used it to curl down the rounded edges. I then folded it in half kind of and glued the ends together.

Finally, I added some ink with a paintbrush around the edges of the roses, and added some stickles. I also added stickles to the centers of the calalilies, and arranged it all with a couple of larger leaves from Prima.
It was really easy, and so fun. It took a little bit of patience, but so worth it. Give it a try! TFSB!

Pin It!

Monday, August 16, 2010

Just catching up....

It occurred to me today how ridiculously behind I am with the kids scrapbooks. Oliver will be 3 in October, so I should be finishing up his 2-3 yr. album. Instead, I am only half way through his 1-2 yr. album. And, it is the same way with the rest of the kids' books. So, I find my self doing a lot of scraplifts, and some simpler page designs to try and get caught up. Here are a few pages I have done lately:

Sweet dreams: This one was kind of inspired by the Jenni Bowlin Studio products, I love her stuff, kind of vintage-y/ office inspired types of things.


He loves him : This one I actually lifted from the cover of the October issue of Scrapbooks Etc. It kind of has a school type theme to it even though it really has nothing to do with school. I find a lot of my boy pages have an office or school theme, or lots of stars. I try to make them as masculine as possible, otherwise my husband complains :)


I hope to get a lot more done with in the next couple of weeks, so I'll post some more soon. TFSB.


Pin It!

Thursday, April 15, 2010

Grilled Chocolate Marshmallow sandwich

I promise I ate this before I was pregnant. I actually came across the recipe in a magazine. I don't usually keep a lot of sweets in the house, or bake too often....because I am home with it all day and WILL eat it. But every once in awhile I have got to have something sweet. That's when this recipe comes in handy, if I want something bad enough I make it. You basically make it like a grilled cheese. Spread some marshmallow creme on a slice of bread, melt about 1/4 c. choc. chips in the microwave and spread it on another slice of bread. Put them together, butter one side place in pan butter side down, butter the otherside and flip when ready. When I first saw the recipe I thought it was weird, but I was curious enough to try it, and it's awesome. It's not something I do every day, but every once in awhile, it hits the spot.
Pin It!

Wednesday, March 31, 2010

Caramel Mocha

I thought I would share my recipe for a caramel mocha. I've made it for a few people, and they really seem to like it. If you have an espresso machine, brew two shots of espresso (one if you don't like strong coffee) and pour into a large-ish mug that already has chocolate syrup (I use hershey's) and caramel ice cream topping in it ( I use smuckers). Enough caramel to cover the bottom of the cup, and enough chocolate to cover the caramel - probably about a tablespoon of each. I put an extra scoop of sugar in it because I use 2 shots of espresso, you probably won't want to do that for one. Fill the rest of the way with steamed milk (about a cup), and top with ready whip.
If you don't have an espresso machine...you can get similar results by using 1/2 cup of very strong brewed coffee ( 1/4 cup if you don't like strong coffee), and heating your milk in the microwave. Let me know if anyone tries it and what you think! TFSB.
Pin It!

Tuesday, February 16, 2010

homemade cosmetics


Well, like I need another hobby...but I actually came across this one by accident. I have been looking for a miracle cream for Oliver (ever since the day he was born), who seems to have eczema. It especially effects his face, which I thought was from teething...but he hasn't been cutting teeth for awhile, and is still plagued by it. I've tried vaseline, baby oil, Eucerine cream, Aveeno, my cousin even made a special salve with tea tree oil and some other stuff in it. That's just to name a few. I went to a craft fair with my mom, and every year she buys this 'dry skin cream' from a lady who has a booth there. I decided to give this a try even though it was $20 a jar. It did seem to help more than anything else had, but she also gave me a tube of her chapstick...which oddly enough really seemed to clear up his face. ( I noticed his face was really broke out one day when we were away from the house, and this chapstick was all that I had with me.) When I ran out of these two things, I was trying to figure out how to order some more. I decided instead of paying $3o plus shipping fees, maybe I would try to make my own. So, I looked up some recipes on line and bought some supplies. First I made a whipped body butter, which I don't have any pictures of the process ( I thought of that after the fact) but here is the recipe:

1 1/3 c. shea butter, 1/2 c. olive oil
1 t. vitamin E oil, 1/4 oz. fragrance

Heat the shea butter up slowly in a sauce pan until liquid form than add olive oil
Let mixture cool for 30-40 min, without letting it fully set back up. Add
vitamin E and fragrance. Now, use a blender to whip the mixture until it is very light in texture.
Do not over pack whipped body butter into chosen container.

Mine turned out a little oily, but I also added some coconut oil to mine. ( I have a hard time following directions.) It has really cleared up Oliver's skin nicely.

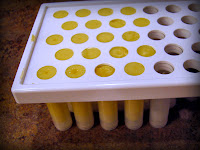
I also made some chapstick. I purchased the tubes from sks bottles and packaging, I bought the beeswax pellets at soapgoods.com. Here is that recipe:

3 t. beeswax pellets, 4t. cocoa butter
5t. olive oil, 2t. lanolin
1/2 t. honey, 5-10 drops fragrance

Place beeswax, cocoa butter, olive oil and lanolin in glass dish. Put glass dish in pot of
water ( a couple of inches) , and boil until everything is in liquid form and well mixed.
Remove glass dish from pot and add honey and fragrance. Poor into
tubes and let cool.

I doubled this recipe and it made 20 tubes.


Pin It!

Wednesday, January 27, 2010

My Etsy shop


I did it! I opened up my shop on Etsy. I have about five things up right now, and am currently working on four more things to post. We'll see how it goes, you might just be seeing a lot of pages from me using my own products. Even if it's not successful, I've had a lot of fun doing it. Stop by my shop and take a look! http://www.etsy.com/your_shop.php
Pin It!

Thursday, January 21, 2010

Etsy shop


Welcome to my blog! I mainly started this blog to share the things that I make, I don't know how many people are actually into that, but I know I get a lot of inspiration from other crafters. I'm just going to get right into things and share something I've been working on. I plan on opening a shop on etsy...featuring scrapbooking embelishments. I have a ton of misc. boxes piling up in our basement...courtesy of my pack rat husband, he plans on burning them in the woodstove. Well, I decided to take some of that and turn it into something creative. Using my die-cutting machine, I've cut some shapes, and am working on embelishing them. When I have enough made up, I will be opening a shop and posting it. Thanks for looking!
Pin It!